
 Bookmark
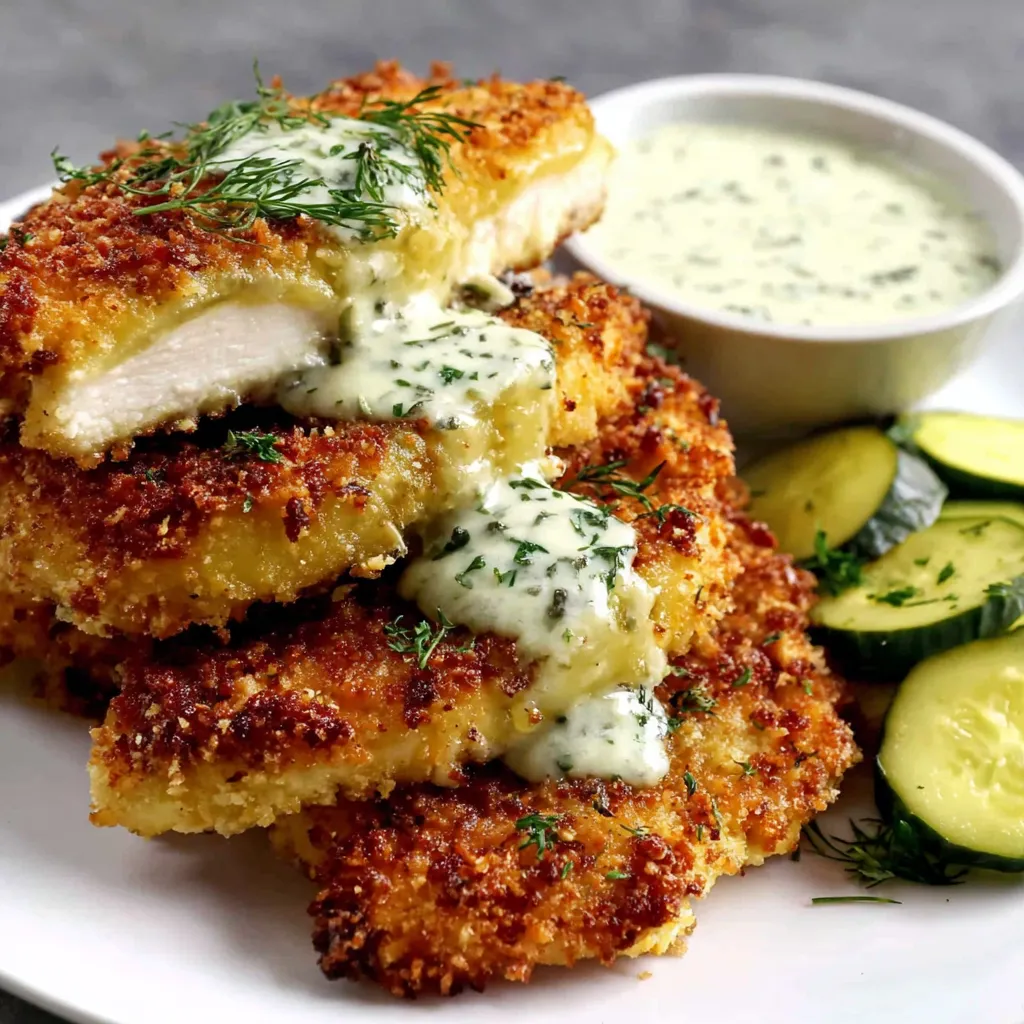
This hearty Crispy Dill Pickle Parmesan Chicken has become my secret weapon for impressing dinner guests without hours of complicated prep. The magic happens with a quick pickle juice soak that transforms ordinary chicken into something extraordinarily tender and flavorful.
I discovered this technique during a pandemic cooking experiment and now my family specifically requests "that pickle chicken" at least twice a month. The combination of tangy brine and savory parmesan creates a flavor profile that keeps everyone coming back for seconds.
Ingredients
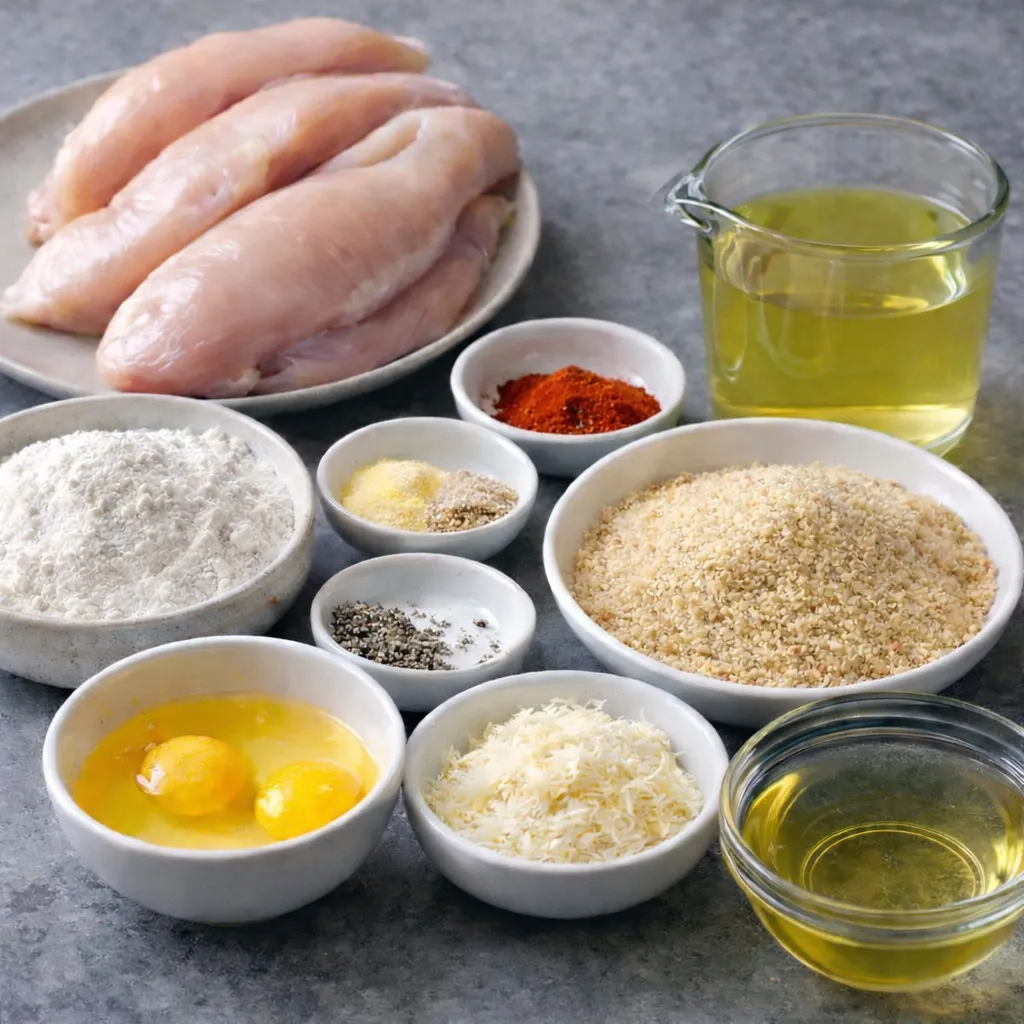
- Boneless skinless chicken breasts which provide the ideal canvas for our flavorful coating
- Dill pickle juice from that jar sitting in your fridge transforms ordinary chicken with its brining power
- All purpose flour creates the foundation for our crispy coating
- Garlic powder and onion powder add depth without overpowering the other flavors
- Paprika brings subtle warmth and gorgeous color to the finished dish
- Eggs act as the essential glue that holds our breading layers together
- Seasoned breadcrumbs create that unmistakable crunch factor we all crave
- Finely grated Parmesan cheese adds rich umami notes that elevate the entire dish
- Neutral cooking oil allows for perfect frying without competing flavors
Step-by-Step Instructions
- Brine the Chicken
- Submerge your chicken breasts completely in pickle juice using either a shallow dish or ziplock bag. This step is crucial for tenderizing the meat and infusing that subtle tang that makes this recipe special. Allow at least 30 minutes but no more than 2 hours to avoid over-brining. After brining pat the chicken completely dry with paper towels to ensure proper breading adhesion.
- Prepare the Breading Station
- Create an efficient assembly line with three separate shallow dishes. First combine flour with all dry seasonings for the initial dredge. In the middle dish whisk eggs until completely uniform. For the final station mix breadcrumbs thoroughly with grated Parmesan cheese until fully incorporated. This three step process is the secret to perfect coating adhesion.
- Bread the Chicken
- Handle each chicken piece individually through the breading process for best results. Begin with a thorough coating in seasoned flour ensuring every surface is covered then gently tap off excess. Next fully immerse in egg wash allowing excess to drip away. Finally press firmly into the breadcrumb Parmesan mixture packing the coating onto all sides. Place breaded pieces on a plate without stacking.
- Fry Until Golden
- Heat oil in a heavy bottomed skillet until shimmering but not smoking. The oil should reach approximately half an inch depth for ideal frying. Carefully add chicken without overcrowding the pan working in batches if needed. Cook undisturbed for 5 to 7 minutes before flipping once. Continue cooking until deeply golden and internal temperature reaches 165°F. Monitor heat to maintain consistent temperature throughout cooking.
- Rest and Serve
- Transfer finished chicken to a wire rack or paper towel lined plate to drain excess oil. Allow a brief 2 to 3 minute rest which helps the juices redistribute throughout the meat. Serve immediately while still hot and crispy for the ultimate texture experience.
 Bookmark
My absolute favorite part of this recipe is watching people take their first bite. They always expect it to taste overwhelmingly like pickles but instead experience this beautifully balanced savory chicken with just enough tang to keep them guessing. My daughter who normally picks breading off everything actually asks for extra of this coating.
Make Ahead Options
This chicken can be prepared through the breading stage up to 8 hours in advance. Simply arrange the breaded pieces on a baking sheet lined with parchment paper and cover loosely with plastic wrap in the refrigerator. When ready to cook simply continue with the frying instructions. The cold chicken may require an extra minute or two per side to reach proper internal temperature.
Healthier Alternatives
For a lighter version this chicken adapts beautifully to both baking and air frying methods. For oven baking arrange breaded chicken on a wire rack over a baking sheet and cook at 400°F for approximately 22 minutes flipping halfway through. Air fryer enthusiasts can cook at 375°F for about 15 minutes flipping once midway. Both methods produce excellent results with significantly less oil while maintaining good texture.
Perfect Pairings
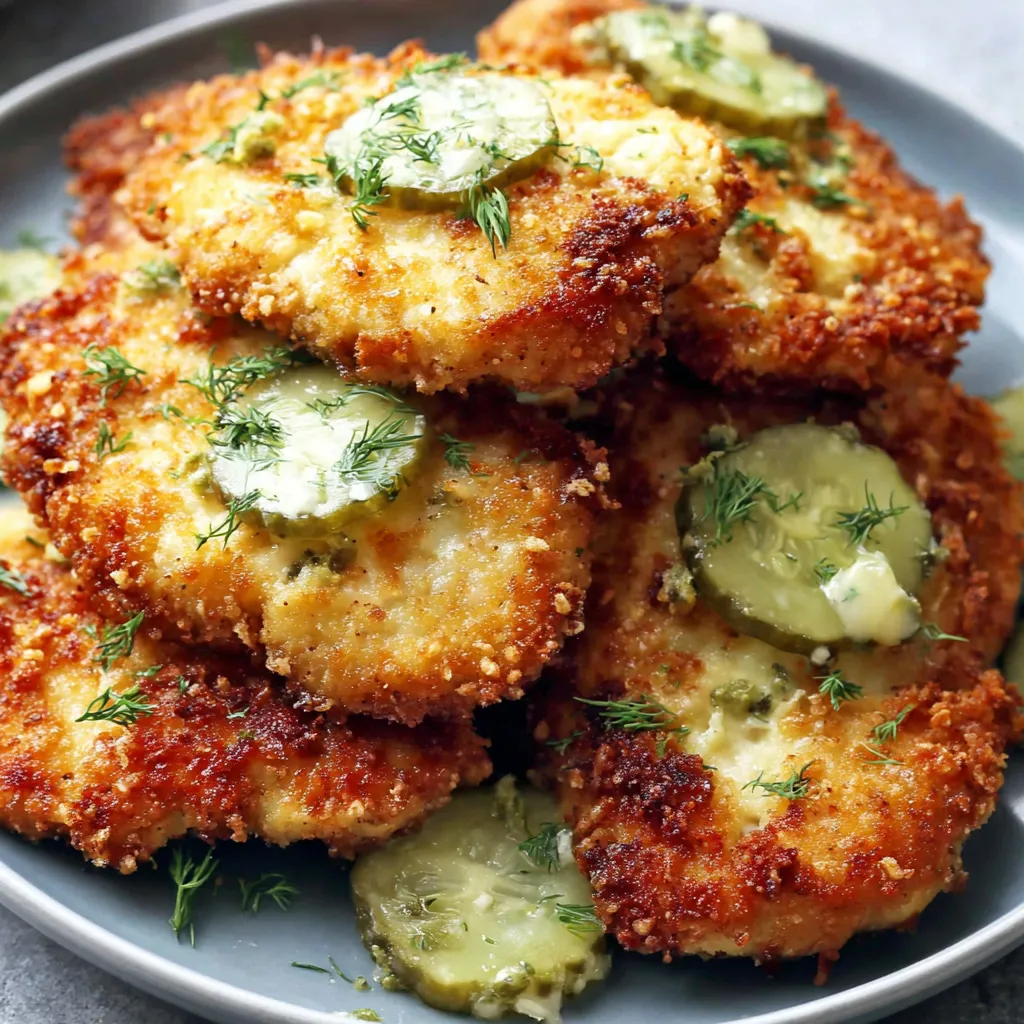
This crispy chicken deserves thoughtful accompaniments that complement its flavors. For a complete meal serve alongside creamy mashed potatoes which provide a soft textural contrast to the crunchy coating. A simple arugula salad dressed with lemon vinaigrette cuts through the richness beautifully. For a casual approach transform it into an epic sandwich on brioche with sliced pickles and sriracha mayo. During summer months slice it over mixed greens with cherry tomatoes and cucumber for a hearty salad.
 Bookmark
Recipe FAQs
- → How strong is the pickle flavor in the finished chicken?
The pickle flavor is pleasantly subtle. The dill pickle juice functions primarily as a tenderizing brine that adds a gentle tang to the chicken without overwhelming it. The final result is perfectly balanced, with the savory Parmesan crust being the dominant flavor profile.
- → Can I use chicken thighs instead of breasts?
Absolutely! Chicken thighs work wonderfully with this preparation method. They tend to be even juicier than breasts and pair beautifully with the tangy brine and crispy coating. Just adjust cooking time slightly as thighs may take a few minutes longer to reach 165°F internal temperature.
- → How can I make this dish without frying?
This chicken adapts well to alternative cooking methods. For baking, place the breaded chicken on a wire rack over a baking sheet at 400°F for 20-25 minutes, flipping halfway. For air frying, cook at 375°F for 15-20 minutes, turning halfway through. Both methods will still yield a crispy exterior, though slightly less golden than traditional frying.
- → What sides pair best with this chicken?
This versatile chicken pairs beautifully with many sides. Classic options include mashed potatoes, roasted vegetables, or a crisp green salad. For a complete meal with complementary flavors, try serving with coleslaw, potato salad, or garlic green beans. The chicken also makes an excellent sandwich filling with some mayo and fresh lettuce.
- → How long can I brine the chicken in pickle juice?
For optimal results, brine the chicken for 30 minutes to 2 hours. This timeframe allows the meat to tenderize and absorb flavor without becoming too tangy or affecting its texture. While you could push to 4 hours maximum, anything longer risks the chicken becoming too salty and potentially mushy from the acidic brine.
- → Can I prep this chicken in advance?
Yes, you have several make-ahead options. You can brine the chicken up to a day ahead, then drain and refrigerate until ready to bread. You can also fully bread the chicken and refrigerate it (uncovered for best results) for up to 4 hours before cooking. For optimal crispiness, it's best to fry just before serving, though the cooked chicken reheats reasonably well in a 350°F oven.