
 Bookmark
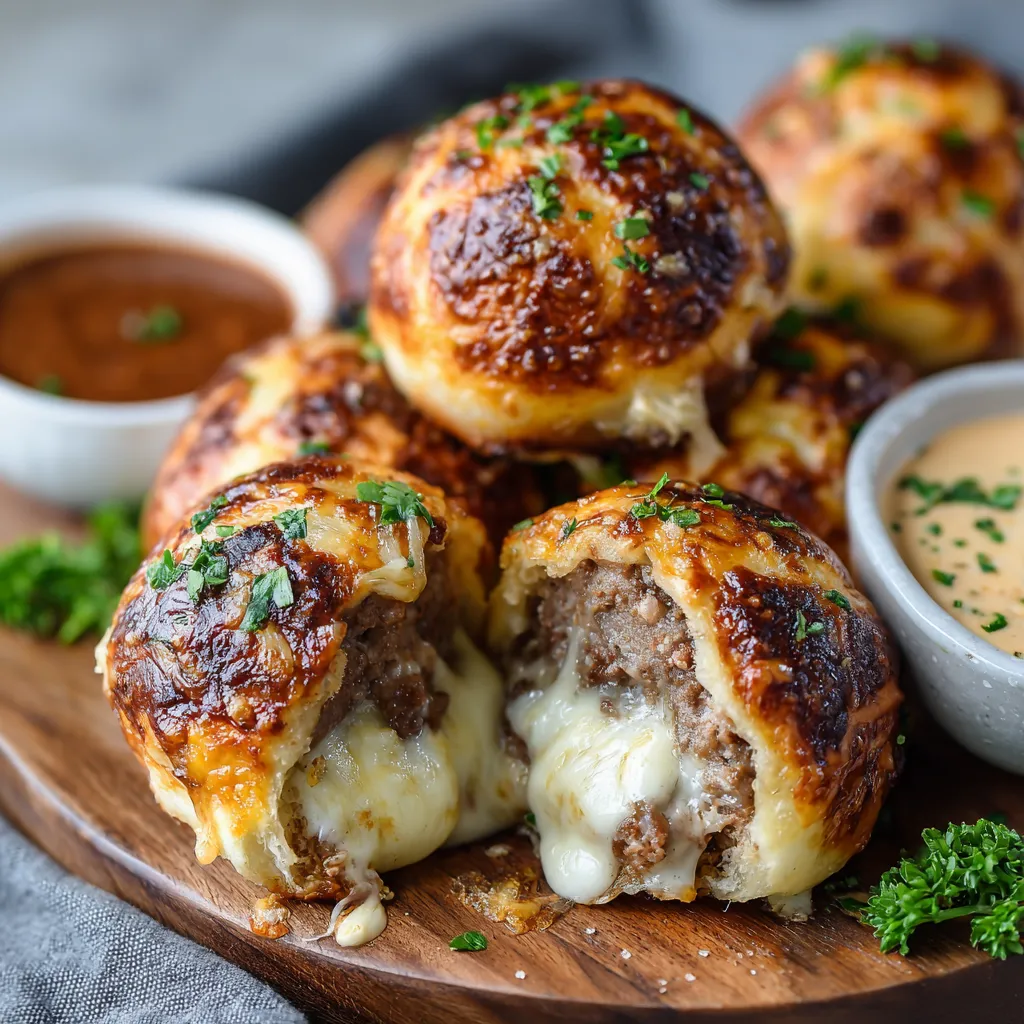
This hearty Cheesy Garlic Parmesan Burger Bombs recipe transforms ordinary ground beef into irresistible bundles of joy that combine all the flavors of a classic cheeseburger wrapped in golden, buttery biscuit dough.
I first made these during a football game night at our house and they disappeared faster than any other dish. Now my family specifically requests these "burger bombs" whenever we have guests over or just need a comforting dinner with a twist.
Ingredients
- Ground beef creates the hearty filling base choose 80/20 for the best flavor balance
- Worcestershire sauce adds that classic umami burger flavor that makes these truly special
- Shredded cheddar cheese melts perfectly inside creating that satisfying cheese pull
- Refrigerated biscuit dough provides an easy shortcut with perfect texture every time
- Fresh garlic for the coating delivers aromatic flavor that elevates the entire dish
- Grated Parmesan adds a nutty salty finish that makes these bombs irresistible
Step-by-Step Instructions
- Prepare the Beef Mixture
- Brown ground beef in a skillet over medium high heat breaking it apart with a wooden spoon until crumbly. Season thoroughly with salt black pepper garlic powder onion powder and Worcestershire sauce ensuring each bite is flavorful. Cook for a full 6 8 minutes until no pink remains then remove from heat. Allow the mixture to cool for about 5 minutes before folding in the shredded cheddar cheese which will partially melt into the warm meat creating a cohesive filling.
- Prepare the Biscuit Dough
- Take each refrigerated biscuit and place on a lightly floured surface. Using your palms or a rolling pin gently flatten each one into a 4 5 inch circle working from the center outward. The dough should be thin enough to wrap around the filling but thick enough to maintain its structure approximately 1/4 inch thick throughout.
- Assemble the Bombs
- Scoop 2 3 tablespoons of the beef cheese mixture directly onto the center of each flattened biscuit. Carefully gather all edges of the dough upward around the filling meeting at the top like a purse. Pinch firmly and twist slightly to create a secure seal making sure no filling can escape during baking. Roll gently between your palms to form a smooth ball shape.
- Prepare the Garlic Parmesan Coating
- Melt butter in a microwave safe bowl then stir in minced garlic allowing it to infuse for about 30 seconds. In a separate bowl combine the grated Parmesan cheese with fresh chopped parsley mixing thoroughly to create an even distribution of flavors that will form a savory crust.
- Coat and Bake
- Arrange the sealed bombs seam side down on a parchment lined baking sheet spacing them about 2 inches apart. Brush each one generously with the garlic butter mixture ensuring complete coverage for maximum flavor. Sprinkle the Parmesan parsley mixture evenly over the tops pressing gently to adhere. Bake in a preheated 375°F oven for 15 18 minutes until the exterior turns a deep golden brown and the dough is completely cooked through.
- Serve
- Let the bombs rest on the baking sheet for 2 3 minutes to allow the filling to set slightly and prevent burning. Transfer to a serving platter and enjoy while still warm when the cheese is perfectly melted and stretchy.
 Bookmark
The Worcestershire sauce in this recipe is actually my secret weapon. I discovered its importance when I accidentally left it out once and the flavor was noticeably less "burger like." Now I sometimes add an extra dash directly to the butter coating for even more depth.
Make Ahead Options
These burger bombs are perfect for busy households needing prepared options. Assemble everything up to the baking stage, then refrigerate for up to 24 hours before cooking. Place them on a baking sheet, cover lightly with plastic wrap, and store in the refrigerator. When ready to bake, simply brush with the garlic butter, sprinkle with Parmesan, and add 2 3 minutes to the baking time since they'll be starting cold. The convenience of having these prepped and ready makes weeknight dinners much less stressful.
Flavor Variations
The basic recipe creates a classic cheeseburger flavor, but numerous variations can keep this recipe exciting. For a mushroom Swiss version, sauté 1 cup of finely chopped mushrooms with the beef and substitute Swiss cheese for cheddar. Create pizza bombs by adding pepperoni and Italian seasoning to the beef and using mozzarella instead of cheddar. For Mexican inspired bombs, mix in taco seasoning, chopped jalapeños, and use pepper jack cheese. Each variation maintains the same cooking method but provides entirely different flavor profiles.
Serving Suggestions
These bombs stand beautifully on their own, but thoughtful pairings elevate the meal. Serve alongside a simple green salad dressed with vinaigrette to balance the richness. For a more substantial meal, add sweet potato fries or a light tomato soup for dipping. Set out small ramekins of classic burger condiments like ketchup, mustard, or special sauce for an interactive dinner experience. During summer months, these pair wonderfully with corn on the cob or a fresh cucumber salad for a complete cookout inspired meal without the grill.
Recipe FAQs
- → Can I make these burger bombs ahead of time?
Yes, you can assemble the bombs up to 4 hours in advance and refrigerate them before baking. Add an extra 2-3 minutes to the baking time if cooking from cold. You can also prepare the beef mixture up to 24 hours ahead and store it in the refrigerator until ready to assemble.
- → How do I ensure the filling doesn't leak during baking?
To prevent leakage, make sure your ground beef mixture is completely cooled before assembling. When sealing the dough, pinch firmly and twist the seams to create a tight seal. Don't overfill the biscuits as this can cause them to burst open while baking. If the dough becomes sticky while working, lightly dust your hands with flour.
- → Can I freeze these garlic Parmesan burger bombs?
Absolutely! You can freeze the assembled, unbaked bombs on a baking sheet, then transfer to a freezer bag. Bake directly from frozen, adding 5-7 minutes to the cooking time. For cooked bombs, freeze for up to 2 months and reheat directly from frozen in a 350°F oven.
- → What sides pair well with these cheesy bombs?
These pair excellently with lighter sides like coleslaw, potato salad, or a fresh green salad to balance the richness. For a complete meal, serve with a simple vegetable dish like roasted broccoli or a tomato cucumber salad.
- → Can I use different types of cheese or meat?
Definitely! While cheddar works wonderfully, sharp cheddar, Monterey Jack, or pepper jack make great substitutes. You could also experiment with ground turkey or chicken instead of beef, just adjust seasonings accordingly as these meats are milder. For a spicier version, add red pepper flakes to your meat mixture.
- → What's the best way to reheat leftovers?
To maintain the crispy exterior, reheat leftovers in a 350°F oven for 5-7 minutes until warmed through. Avoid microwaving as this will make the biscuit dough soggy and compromise the texture. Store leftovers in an airtight container in the refrigerator for up to 3 days.